Sunday, September 22, 2013

Synectic Design Game

1
Above is a photo of one of my favorite projects I completed during my years at Park University. The goal of the "game" was to generate original designs from base shapes. I chose to cross organic shapes with geometric shapes. I explained to my students that it worked kind of like a multiplication table. Overlapping, implying, hybrid-ing- all allowed! The kids were completely overwhelmed when I showed them mine, so I had to reassure them that theirs would be much less complex. So we started out by developing the game board below. I had to make a lot of adjustments based on the paper sizes. You really just need a 3x3 grid. I chose to walk through the whole process using the document camera. Older students could probably handle simple instructions on their own. (You would be surprised, though, at how poorly  some 5th graders operate a ruler.)

We discussed the first two elements: line and shape before beginning this whole process. So, in the box in the upper left hand corner, I had them split it with the words GEOMETRIC  and ORGANIC. We used boxy, staight-lined letters for geometric and bubbly, curvy letters for organic. Then, they were to develop two organic shapes for the top horizontal rows and two geometric shapes for the left hand column. From there, they generated four new designs that were the product of those original shapes crossing paths. They were encouraged to use scrap paper and the light box/window to layer tracings of their originals. 
This is one of those that I am not entirely sure I would do again. I couldn't believe how much some kids struggled. They were mostly confused about what went where or how to creatively combine them. Sometimes they came up with really cool designs but I had to ask where they got them from because they definitely didn't follow my procedures. A handful from each class REALLY got it! Maybe with more time to experiment, they would have emraced the tracing and overlapping techniques, but that's what is hard about elementary specials classes- you don't see them enough to spend more than 2 or 3 periods on a project. My take away for this is that they learned how to make straight-lined grids with a ruler. They can never get enough practice using those tools! I would highly reccomend this project to anyone that teaches high school!  

Saturday, September 21, 2013

Dinosaurs Collage

I have been feeling bad for my second graders because they are my last class of the day. They have the disadvantage of following kindergarten and first grade. By this point in the day, my energy is at an all-time low. So I decided to give them the most exciting, hands on project I could think of! And I'm happy to say that this one, unlike most others, was not "inspired" by Pinterest. This one, was inspired by a book I found in our school library called "Dinosaurs Roar, Butterflies Soar." This was a cute little non-fiction book (Common Core is pushing regular classroom teachers to read just as many non-fiction as fiction now).

I was really inspired by the illustrations in this book. They had great texture and a collage kind of look. So I decided to recreate this particular illustration with the  kids. So the first class, we read this book and discussed texture and collage. Then I gave the kids some paper and crayons, and we drew some dinosaurs together. I've been using those "How To" drawing books with them a lot. These books break steps down and make complex drawings achievable for youngins! Below is our stegosaurus how-to and some of the dinosaur drawings from the kids. 


 The next class period, I had all sorts of pre-cut construction paper for them. I made them start with the two layers of mountain ranges. They were not allowed to use scissors, because tearing gave the mountains a more realistic shape and texture. We crumpled up the lime green paper before cutting it into the shape of grass and foliage. They also added trees and a sunset before inserting their dinosaurs into the scene. I was SO impressed with their work and their ability to follow all of these complex steps. AND when they left- the room wasn't a total nightmare of a mess! Below are two of the kids' collages, and the last one is mine :)


Tuesday, September 10, 2013

Kandinsky Dots

Oh first grade! I must say, first grade might even be more challenging for me than kindergarten. However, kindergartners have a slight edge with their "I'm 5 and was very recently in preschool" innocence. First graders, however, are the real kindergartners. I'm hoping and praying that within a few months- we will have made some major progress! I just have to keep reminding myself to take it slow and ASSUME NOTHING. Can they appropriately use a paintbrush? Assume NO and explain it like they don't! Can they line up at the door without mass chaos? Assume NO and remind them how it will look before they go!

Much like kindergarten, we start our days together on the floor in a manageable space with some sort of story or mini-lesson from me. I began with a YouTube clip that read and animated the book "The Dot" by Peter H. Reynolds. This is a cute little story about a young girl that finds confidence in art by making all sorts of masterpieces with simple dots.

http://www.youtube.com/watch?v=t5mGeR4AQdM&noredirect=1

After the video, I asked them what they thought of Vashti's artwork. I asked them if they thought it looked hard or easy and why people liked it so much. Then I showed them pictures of Wassily Kandinsky's "Concentric Circles." I asked them how it was similar to Vashti's work and why they thought this was so famous. To wrap up discussion we talked about whether or not we could make this kind of artwork even though it was so famous. I got a lot of cute shrugs saying "Well I guess we could Mrs. Byrd!"

So we went to our seats folded up a large piece of paper together until it had eight sections. In each of those eight sections, we drew crayon dots just like Vashti's. For the remainder of class I gave them coloring sheets that looked like "Concentric Circles."
image.jpeg

The following classes, we used water colors to create the concentric circles around our dots. My first rotation of painting was an absolute disaster, so after day one, I completely reevaluated! A few tips I found... Forbid the use of the sink! It seems silly, but it reduces so much chaos. They go to the restroom after specials class anyway, so they don't need to wash their hands. Then, I found a big bucket for me to carry around and dump their dirty water in during clean up. Otherwise... you will have about 10 puddles on the floor from them trying to walk their water to the sink! Yikes!
image.jpeg

I also found it helpful play music while they worked and told them "If you can't hear the music, you are too loud and not focused enough!" The more focused they were, the more they accomplished and the less chaos I had to stress over.

Also never hurts to remind them to...
"Treat your brush like a feather... NOT A MOP!!!"

Zentangle Hands

I'm really on a zentangle/invented texture kick lately! I've always loved the power of well-designed line. And who doesn't love more doodling patterns to store in their book of tricks for when they are bored in other classes?! So I had 4th grade start out the year by tracing their hands. Challenging stuff... I know! They then divided their hand into sections with their pencil and found a way to place their name in the middle. I gave them handouts with dozens of samples of zentangles and designs they could practice. I asked them to fill each section of their hand with a different, intricate zentangle.

They had the option of leaving theirs black and white or colored, but my one rule was that ZERO pencil lines should be showing because they needed to look finished! Once their coloring was complete, they matted their hand on colored construction paper.
image.jpeg

I was really impressed with some of these hands! The girls in particular took their time to really dive into really intricate designs. Other friends were less careful ended up with a sloppy mess. I think in the future, I would have students turn in swatches of at least four different designs they will use. That way, they are forced to practice the designs and use some variety. I think this project could be used at any grade, the expectations just have to go up with age.

image.jpeg

I had one girl point out that these reminded her of the Hindu hand inkings. That could also be neat to use flesh colored paper and brown markers to look like henna ink. Just a thought!

Line and Movement

I was so pleased with how well my 3rd graders started out the year. They dove right in with a tricky project, and we have a very high rate of success. I started the first class by asking them to brainstorm about what LINE is. Most of them couldn't describe it without saying "a straight line." So I had a student read a definition for the whole class that talked about marks of any sort made between two points. Hesitantly, I passed out big fuzzy pipe cleaners to each kid and begged them not to make mustaches or put them in their mouth (this feat was only partially successful... gross..). I asked them to name different types of lines and we bent and twisted our pipe cleaners to make those diagonal, zig zag, swirly, curvy, you name it lines!
image.jpeg

We looked at some paintings and discussed where we saw lines and how those lines made our eyes move around the painting. For the remain of our first session together, I gave students a piece of cardstock roughly 9" by 5". The kids started by using a marker to draw a curvy line from one corner to the other on their paper, then filling out the whole paper with curvy lines that varied in thickness as they moved across the paper. I learned quickly to put away the skinny markers and just let them use the fat ones. Skinny markers color way sloooooowwwweerrrr.
image.jpeg

Students wrapped up their coloring at the beginning of class on day 2. I ended up keeping the kids a little bit into my lunch this day because once you start cutting, you need to glue all the pieces back together or the art room storage closet will eat them! Next, we challenged our measuring skills by turning the paper over (horizontally) and making marks at every half inch. You wouldn't believe how difficult this can be for kids! They then slid their rulers down and repeated those marks right below the top ones. Once they had two sets of marks, they connected them with vertical lines and labeled each section with numbers.
image.jpeg

I was very careful to demonstrate the next step very slowly and repeated myself 5 times for each step. Be prepared to repeat it 5 more times when they start independent practice! As we cut out the strips, we were extremely careful to keep them in order as we turned them back over. I told them it should look like a puzzle put back together again. Once their piece was back in order, I had them start from the middle and glue the pieces outward. I had them think of it like a mouth opening from the left on top and from the right on the bottom.
image.jpeg

A few in each class turned out a little goofy or didn't open different directions, but it really didn't matter because they were absolutely amazed at what they had accomplished by the end of it! It was awesome to watch how far they came in just two class periods. When I first gave them their rulers and directions- you would have thought I asked them to take a calculus test!image.jpeg
image.jpeg

Sunday, September 1, 2013

Name sculptures

As the sole art teacher at my elementary school, I see nearly 600 kids every week in and out of my art room. I have many of their names down when they are in their seat in my art room, but otherwise, I've got a long ways to go! Since I only have my 5th graders for this year, I wanted to get their names down ASAP! So we started out with a project that would let me see their names for 2 solid weeks!

I had them start by writing their names in bubble letters on thick white paper. I suggested making them about the size of the bottom of their palm to their first set of knuckles. I their names were short, they added their last initial or did a nickname instead. For kids that struggled with bubble letters, I had them lightly draw the letter in pencil, trace around the inside, and the outside, then erase the original letter. I reminded them to make sure the letters were thick enough to cut out.

After their bubbles were laid out, I gave them handouts with all kinds of examples of zentangle designs. I just googled zentangles and found plenty of sample patterns for handouts. Each bubble letters was to be filled with zentangles or some sort of design/pattern. They had the option of going over pencil with black marker, or they could use color. Most of them chose lots of bright colors. All of this took the whole first class period.


The second week I had them, we finished up coloring/designing, then cut out all the letters. They got to choose a small square of construction paper (about 4x4). I demonstrated for them several different ways of constructing their sculpture.  I had the most success with making "tabs" with the letters by folding them under then gluing those tabs to the 4x4 construction paper. I reminded them that these would be viewed on the wall from a bird's eye view, so it was important to interlock and interweave letters when possible to create an interesting viewpoint. To fit and stabilize some larger letters, we created an arch and connected the letter with tabs on top and bottom.


I was so pleased with their designs and problem solving. Some kids went about the process a completely different way and got some awesome results!

Optical illusions

For our first official project in 2nd grade, we created simple optical illusions that "tricked our eyes." This project was really simple, but gave us practice with using rulers (you wouldn't believe how tricky that can be!) and following directions.

I had them start out by using their ruler to create vertical stripes on their horizontal paper. If they were right handed, they started on the left side so they could firmly hold down with their left hand. The exact opposite goes for left-handed friends. I gave them some tips about lining their paper up with the side of their paper, and we had success with this step. After that, they were given several cookie cutter shapes to trace. Our paper was only 9x12, so I told them to use at least 3 shapes, but no more than 5. After doing all of this in pencil, I called them back over to demonstrate coloring. 

They all seemed overly confident in this step, but I told them they better watch. It seems that their confidence was a little misplaced, because they needed a lot of help after the demonstration. I recommended they start by coloring in the stripes and leaving all of the shapes blank. They selected two colors or crayons, and colored every other stripe. Once we got that step down, I told them to just make a mark in each shape with the opposite color of the stripe. So if the stripe was green, they made a quick blue mark in the shape inside that stripe. This way, if they messed up, we could easily color over that shape. 

The kids responded really well with this project, and I love seeing them get excited about doing something that looks super challenging to them at first. When they realize they CAN do it, it gives them confidence for next. And not to mention... It gives them confidence in following my directions! 

Pattern Rugs

For the second Kindergarten project, we again began with a picture book. This time I chose two (one for the beginning and one for the end if I needed to stall!) I started class by asking the kiddos what a pattern was. I got a lot of "red blue, red blue" and "1,2,1,2". I asked them if it just had to be numbers or colors. We came up with other patterns like shapes and letters, etc. I read them Pattern Fish by Trudy Harris. One page would show an eel with a "stripe, dot, dot... stripe, dot, ____?" And the kids would fill in the blanks. They played along so well, even when the patterns got kind of tricky.
After reading, I showed them some pictures of rugs and asked if there were any patterns in the rugs. We saw some shapes and colors that repeated. I asked them to quietly find their chair (we do stories on the floor by the Team Board), and wait for directions. I have found that going slowly, step by step, really gets the best results.


First step, I modeled coming up to get paper. They selected a 12x18 piece of white paper, then 4 colored 3x12 stripes. One orange, one blue, one green, one purple. I wish I could give them more choices, but until we get procedures down, them seem to have the most success with uniform supplies. After that, we used "raindrops, not puddles" to glue our stripes down. Make sure to remind them to leave white space at the top and bottom. It also helped to discuss horizontal vs vertical (I have those words written out in their appropriate direction above and beside by door.)

After all stripes were glued down, I gave them each a black marker and drew an example of a pattern on a sample stripe on the white board. They were so creative when I released them to make their own patterns. Some did their initials in a pattern, others drew a person, dog, person, dog. For the final piece, we used scissors to make fringe for our rugs. The clean up for this project was fairly easy. I usually just let one helper handle all the glue, and they do a great job! I love how seriously kids take their helper jobs. you would think they were getting paid!

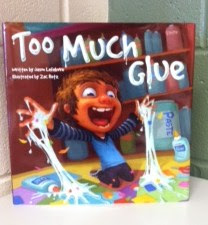
Too Much Glue!

Kindergarten has proven to present a serious challenge for me, but I'm absolutely amazed at how quickly it is falling into place. Just a few tricks have completely transformed how this class period operates, and by the second project, we were having some major success!
I have begun each class with a picture book that relates to our art project for the day. I find that this not only breaks up their time, but gives us nearly 10 minutes of total focus and engagement before diving in. I struggled at first with getting them to stop yelling out and talking over each other, but I find that if I just turn the page and keep reading, they get silent because they can't wait to hear more. Children LOVE stories! And research shows us that a child that is read to has an exponentially larger vocabulary, and can therefore read more fluently, faster than kids who are not read to as a child. 

So we started with Too Much Glue by Jason Lefebvre. This is an adorable book I saw on Pinterest and ordered right away! The illustrations were to die for! Matty ignores his teacher's request to use "Raindrops, not puddles!" and gets himself in a sticky situation. Throughout the reading I would ask the kids questions like "Why do you think the teacher said raindrops not puddles?" or "What do you think is going to happen next?"


We started with a really simple project that let us practice with glue and procedures in the art room. I first let them pick a color of construction paper, then I had pre-cut tiny squares of various colors. I had them use a crayon to draw the first letter of their first name. Seems easy enough... some kids chose some letters that were in the middle. Oh well! After that we practiced opening and closing glue bottles. (If the bottle is closed, a raindrop is showing.) Then, we put raindrops on those pre-cut pieces and glued along our first initials. This whole process only took about 20 minutes, but the book took nearly 15, transitions are always slow, and clean-up took nearly 10 minutes as well. (We have 50 minute classes). Teaching how to logically use a drying rack can be a challenge, too! With any dead time, I let the kids draw pictures around their letter. Some kids got really creative with it, while others just scribbled. The looked cute either way! 


My biggest success in the way of management was the promise of a sticker at the end of class for those who worked hard and followed directions. I just gave them some little smiley faces and would use phrases like "Oh my goodness, it would make me really sad to only give some friends a sticker today." That usually does the trick! We also practiced repeating after me with three claps. That gave me their attention almost immediately.