Showing posts with label 3rd Grade. Show all posts

Monday, December 30, 2013

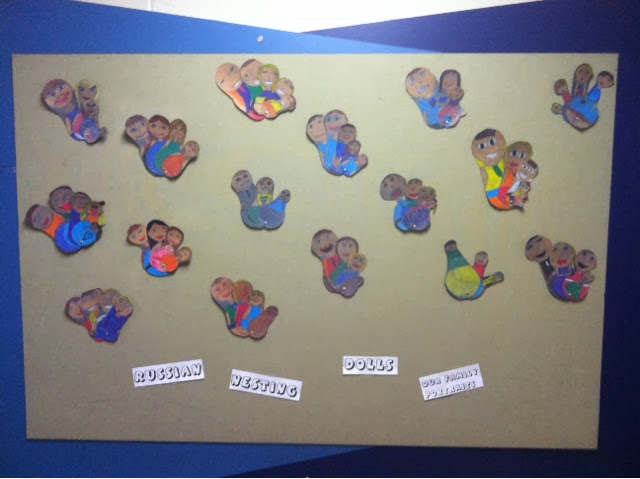
Nesting Dolls

I ran across some cute pictures of nesting doll products on Pinterest, and thought it would be really cute to have the kids make some. I thought about busting out the model magic, but just couldn't find the time left before Christmas to accomplish it. So instead, I made it into a drawing project. Part of third grade curriculum is to make a family portrait of some sort, and I figured this would be a fun way to accomplish that. I found a great website that walked through the history of the nesting doll/objects, so we just scrolled through that for awhile and talked about it.

I wanted to make sure their dolls all had a good base shape to them, so I taught them how to use safety compasses first. I gave them almost 20 minutes with scrap paper to just practice making circles with the compass. You would have thought I gave them new iPads or something... It entertained them forever! 


Once they got the circles down, I gave them a large piece of gray construction paper. I showed them how to stack a smaller circle on top of a larger circle to get the basic shape of the nesting doll. These compasses had the rulers on them, so I was able to explain how to make sure the circles would be the right size they needed. Some kids had as many as seven family members, and others had three. The ones with more just did smaller dolls, but I told them they could choose how many.

They understood how to make the faces and hair for the most part, but adding the clothes was definitely challenging. I told them to start with the neckline, shoulders, and waist.


I chose to have them use color sticks to fill the dolls in. These sticks are wonderful! They are sort of combination of a colored pencil and crayon. They are relatively expensive and shatter pretty easily, so I usually just trust the older kids with them. I love how well they blend together. The color choices are limited, but we were able to pretty much make any color we needed. The colors above are skin tones and hair colors I showed them how to make. 


I emphasized outlining with darker but similar colors a lot. For example, below I outlined the orange shirt with red so that the sleeves were differentiated from the shirt. 


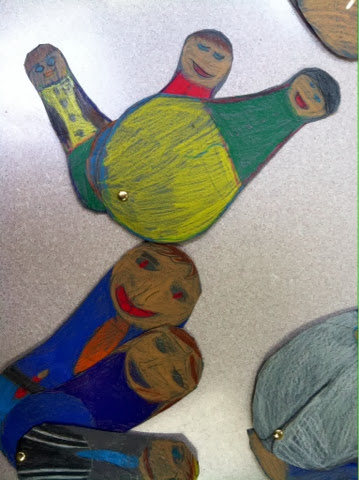
While the kids were still drawing them, I had taken mine to an elementary art meeting in the district. God bless these sweet ladies, they are sooo incredibly helpful to me! One of them suggested fastening them together with a brad so the kids could actually "nest" them. 

And it worked wonderfully!!!!! 


As you can see, the kids all had their own "unique" shape going on with their dolls, but they all looked cute nonetheless! 


A few days too late, I ran across this book on the shelf in our library. It is a Russian folktale centered around Christmas. 


I flipped through the pages and ran across the Baboushka polishing these nesting dolls and thought this would be perfect to read to the kids! However, we just ran out of time... Next year! 

Tuesday, December 10, 2013

Lichtenstein Fruit Bowls

By the end of this 3rd grade project, there were about three or four different versions floating around. Considering I have five sections of 3rd grade, I just couldn't seem to get it right. However, I was very happy with one result in particular, so I would call it a success. That's what your first year is for anyway, right? 

I began this lesson by showing the kids some pictures of traditional still life paintings. Their definition of still life usually involved a person sitting still, so we had to revise that a little. Then, I showed them some famous Pop art from Andy Warhol and Roy Lichtenstein and had them describe it to me. I just love using questioning with them. 3rd grade especially loves to hear themselves talk, and they are old enough to really dig into higher order questions. Lastly, we looked at Lichtenstein's "Still Life with Crystal Bowl." I had them tell me how this one was different from the traditional still life paintings we saw before. They agreed that his was less realistic and heavily outlined. 


All five classes began by drawing fruit onto some heavy card stock. it took us a very long time to get all of these done as they needed a lot of help. I did my best to break down each fruit into shapes/lines they could handle. We filled them up with patterns similar to the comic-like art of Lichtenstein. 


After they cut out their fruit, a few different backgrounds came into play for a few different classes. I attempted to incorporate a cornucopia for Thanksgiving. As you can see from below, though, it turned out a little abstract for my liking. 


The next day, we went ahead and drew the crystal bowls like Lichtenstein's. They looked much better, and were a lot more relevant to the kids. It also gave them practice drawing ellipses, spheres, and cylinders. 


They outlined the bowls in black marker then began to arrange their fruit into the bowl. Rather than gluing the fruit down, I had them use the 3D foam stickers. They are meant to raise pieces in a collage to allow for overlapping. 


I really like how they turned out, because it gave the kids a chance to arrange their still life themselves and gave the picture authentic shadows from the overlapping. 


Once they got their fruit arranged into the bowl, I let them add black and white stripes to the background (these were done using the thickness of a ruler). The piece below was done with a class that only had one day to work, so they had to draw their fruit right into the bowl. I loved that it only took one day, but wish it could have had just a tiny 3D element. 


I went ahead and displayed a few different versions of the project on our bulletin board. It's kind of fun when each class does something a little different. I definitely helps me solidify which ones are worth repeating the next year, and it gives kids (and adults) a chance to compare and contrast every time they walk by on their way to the drinking fountain or back to class.  

Saturday, November 16, 2013

Candyland

We recently held our annual carnival at my school. The theme for this year was "Candyland." I'm questioning how much influence this theme actually has, because other than these projects, I really didn't see much of this theme anywhere. It just looked like any other carnival. Regardless, the classroom teachers were asked to decorate their bulletin boards outside of their classrooms with student work that reflected the theme.

I really feel for classroom teachers with the arrival of Common Core. They have absolutely zero free time for fun things like crafts anymore. So, I volunteered to accomplish this task during art class with the kids. It's really not as generous as it sounds. I have to be doing art with them anyway, and it's not hard to tie candy into things I would have already had them do anyway. For example, fifth grade was working on still life. Cupcakes are just as good of subjects as plastic fruit and turn out much cuter. 


I omitted the work of kindergarten and first grade because it was unrecognizable... Kindergarten drew peppermints. About 2 or 3 of each class looked like peppermints. The rest were a mess, and I had to just be okay with that. First grade drew a Candyland landscape. I actually thought they were pretty cute, I just didn't catch them in time to photograph. The above picture is the second grade project. I was able to tie in the color wheel and they figured out patterns (each color has five spaces in between itself). 


Third grade has been working with tints and shades, so I had them make these ice cream cones. The selected two colors of construction paper for each scoop. One a shade and one a tint. They struggled a lot. Not with the choosing of the tints and shades, but with the concept of layering them together with a perfect fit. Something strange happens with third graders. I think this must be the stage of development where kids become aware that they are not good at everything. My second graders have all the confidence in the world (though, some is misplaced), but third graders are very afraid of making mistakes. They constantly ask me if what they have done is good or acceptable. It starts to drive me crazy having to reassure them all of the time, but I'm trying to remember they just want to do it right. 


I loved the fourth grade project! I found a collage of candy boxes and wrappers that only showed a snippet of the label. The kids were asked to draw exactly what they SAW, not what they KNOW. I told them it was going to be tempting to write the whole "k-i-t k-a-t" but to hold back think about where it actually began and ended in terms of the square. This was very difficult for some of them, and I made them start over several times when they were being stubborn about going around the assignment. Some of them absolutely knocked it out of the park, though. That box of Dots above looked almost exactly like the one on the collage. I will definitely use this assignment again, regardless of whether or not it has to do with a carnival theme. I've thought about having the kids bring the product of their choice and try to copy the label exactly. I know copying isn't necessarily art, but it is a crucial drawing skill to see relationships in sizes and shapes and to be able to reproduce what you see. 


Lastly, fifth grade was studying still life. I order Scholastic Art magazines for my class. They are designed for 4th-8th graders. We had a great time looking through them and reading them out loud together. That month's issue focused on still life, so we talked about things like overlapping, geometric forms, foreground and background, etc. I scratched the pumpkin still life idea and just went ahead and did cupcakes. There are some great how-to videos on YouTube about cupcakes, and I copied a bunch of reference handouts I made for them, as well. The icing was the hardest part, but once they got it, they couldn't stop drawing them. The fifth grade teachers asked me why their kids were drawing cupcakes all over their math assignments and writer's notebooks. That makes me feel good to know that they are learning to draw things that they like and that they can keep in their "toolbox" of things they know how to draw. I was always a sucker for drawing my hands once I had a success with it in middle school. Hopefully they will have plenty of successes to come!


Sunday, November 10, 2013

Monochromatic Paper Sculpture

This 3rd grade project is possibly the most complex thus far. I sought to make it a two-class period project, but somehow barely squeezed it into three. It required a lot of adjustments, but I think by the time I do it again next year, I'll have all the kinks worked out. Oh, and not to mention, I had my first formal evaluation with my principal during this lesson!

We began by discussing a non-objective design. Luckily, I have two of my own paintings in my room that make for perfect examples of objective and non-objective. I emphasized that non-objective is not trying to make a picture of something that we recognize. So I had them pencil in a simple, non-objective design on their paper. I suggested picking two shapes (organic or geometric) then repeating them each three times in different sizes on their paper. Mine below repeated diamonds and s-curves.


After designs were penciled in, we discussed tints and shades and the concept of monochromatic. I found a cute video made by students with a clever little jingle about monochromatic painting. The kids were a little confused why they only got to use one color, but once they got to mixing tints and shades they saw how difficult that would be with more than one color. 

The were only allowed to choose a primary or secondary color for painting (of course I still got requests for pink...) just to keep it simple for me. I made the mistake of trying to get them to do all of the painting in one class. Never again. The first day we did the base color on a few shapes/spaces. The second day, we mixed tints and shades. I only gave them a tiny dot of black, or they turned way too dark way too fast. 


The third day, we flipped the paintings over and measured out nine two-inch sections. We measured with the paper sitting horizontally... if that makes sense... I stressed over and over not to cut out all the pieces at once. One at a time, showed them how to cut and glue so that the pieces would have a 3-dimensional quality. I explained it in terms of "one hill, two hill, one hill, two hill." Leaving a little bit of space at the top and bottom gave the hills less room to stretch and more room to curve. 

I made them glue their pieces on the complementary color of their painting. I might eliminate this next time so we can have more variety. I ended up with a lot of blues on oranges and purples on yellows. 


The kids caught on pretty quickly. A few struggled with the "two hillers." So I showed them a trick with the pointer fingers and thumbs that I have no idea how to explain with words... Sorry! 


These kid examples are really the best of the best. I would say the most difficult part for them was creating a design that allowed the differences in values to show up. Some would paint all their shapes the base color, then have nowhere logical to put tints and shades. If I do this project again next year, I think I'll definitely think of a way for them to be more successful developing a non-objective design. I might even think about taping off the paper and just doing geometric shapes to contrast with the organic curves they get from bending the paper. Regardless, they had fun and were very proud of their work. Aaaanndd! They can tell me what tints and shades are!

Sunday, October 6, 2013

Folk Landscapes

I found a really cute, simple project for third grade that they are absolutely loving! It's one of those projects that they go "WHOOAAAA!!!" when you first show them the end goal, then they are surprised at how well they achieve the objective. I started by picking their brains about the term "folk art." They came up with folk tales, so we connected the dots saying it's a "stretch of the imagination." Then I asked them about landscapes and how those could be "folk." They got the idea that folk landscapes used unrealistic colors and patterns at times to convey real life. (Below is my example.)


To begin the project, I drew my paper on the white board so they could follow along. We discussed how important horizon lines are in any landscape. (I'm trying to connect the dots between the word "horizontal" and "horizon" for all of the grades so they are vertical/horizontal knowledgeable. (Also a Common Core item.) They did a great job following along with me, drawing a horizon line, "V" trees, a sunset, and a barn. I gave them some freedom to make variations in their own work. I asked them to fill in the landscape lines with unrealistic colors and patterns. This step took them a long time, so they finished up their drawings in the second class period. Below I have some finished products, but many of them are taking forrreevvvverrrrr with all the details!:) They got really creative with their patterns!
                       

Tuesday, September 10, 2013

Line and Movement

I was so pleased with how well my 3rd graders started out the year. They dove right in with a tricky project, and we have a very high rate of success. I started the first class by asking them to brainstorm about what LINE is. Most of them couldn't describe it without saying "a straight line." So I had a student read a definition for the whole class that talked about marks of any sort made between two points. Hesitantly, I passed out big fuzzy pipe cleaners to each kid and begged them not to make mustaches or put them in their mouth (this feat was only partially successful... gross..). I asked them to name different types of lines and we bent and twisted our pipe cleaners to make those diagonal, zig zag, swirly, curvy, you name it lines!
image.jpeg

We looked at some paintings and discussed where we saw lines and how those lines made our eyes move around the painting. For the remain of our first session together, I gave students a piece of cardstock roughly 9" by 5". The kids started by using a marker to draw a curvy line from one corner to the other on their paper, then filling out the whole paper with curvy lines that varied in thickness as they moved across the paper. I learned quickly to put away the skinny markers and just let them use the fat ones. Skinny markers color way sloooooowwwweerrrr.
image.jpeg

Students wrapped up their coloring at the beginning of class on day 2. I ended up keeping the kids a little bit into my lunch this day because once you start cutting, you need to glue all the pieces back together or the art room storage closet will eat them! Next, we challenged our measuring skills by turning the paper over (horizontally) and making marks at every half inch. You wouldn't believe how difficult this can be for kids! They then slid their rulers down and repeated those marks right below the top ones. Once they had two sets of marks, they connected them with vertical lines and labeled each section with numbers.
image.jpeg

I was very careful to demonstrate the next step very slowly and repeated myself 5 times for each step. Be prepared to repeat it 5 more times when they start independent practice! As we cut out the strips, we were extremely careful to keep them in order as we turned them back over. I told them it should look like a puzzle put back together again. Once their piece was back in order, I had them start from the middle and glue the pieces outward. I had them think of it like a mouth opening from the left on top and from the right on the bottom.
image.jpeg

A few in each class turned out a little goofy or didn't open different directions, but it really didn't matter because they were absolutely amazed at what they had accomplished by the end of it! It was awesome to watch how far they came in just two class periods. When I first gave them their rulers and directions- you would have thought I asked them to take a calculus test!image.jpeg
image.jpeg