Saturday, March 1, 2014

Claes Olden"burgers"

I've always taken a liking to the artist Claes Oldenburg. What's not to like? He makes giant sculptures of everyday things like hamburgers, shuttlecocks, and cherries on a spoon. I appreciate that it's not overly-conceptual, just fun. And kids love it! I showed them a quick presentation about him, mainly with pictures of his art that is at the Nelson in Kansas City like "Soft Switch" and the shuttlecocks on the lawn. We talked a little bit about fast food in general and when it came about and how and why Claes incorporated it into his work. 


In response, we created these fun Olden"burger" collages. I loved how simple and doable the steps were for the kids and the fact that every kid was able to be successful if they just followed the directions. A lot of kids are held back by their fear of drawing, but this project was all cutting, folding, crumpling, fringing, etc. There wasn't a single burger that didn't look great. 


I loved the pickles in this one above. One of my girls asked me if she could use the markers and I shrugged and said "sure." I LOVED how these turned out. The next class all did theirs this way (I gave her the credit for the idea...) I think the onions made them look extra colorful and delicious. 


On the back of their projects I had them write out Claes Oldenburg and "Giant Hanburger" and told them to explain this to their parents when they take these home so their parents weren't confused why Mrs. Byrd made them make fast food. One girl made the disclaimed that hers was a veggie burger, so we added that detail to the back. So if you have any vegans, fear not. It is adaptable. 

This took them two class periods with very few minutes to spare. I'll definitely be doing this one again in years to come. 

Sunday, February 16, 2014

Radial Symmetry

A fellow art teacher in the district showed me this awesome project! I love that it looks really complicated but really isn't. I think many grades could handle this, but I stuck with 5th grade because I felt like they deserved a relaxing project to ease them back into the swing of things after winter break. We discussed a few concepts such as radial symmetry and folding techniques, but more than anything, I just told them that I wanted them to experiment and see what they could come up with. 

Below are the steps of the most basic design. I pre-cut hundreds and hundreds of 2" x 2" construction paper squares. They were able to choose their own color scheme, but we all worked on a black 9" x 9" square for the background. First step was the fold the square in half.


Next, you fold the corners in from the "open" edges. 


It should look similar to a paper football when it's done.


The other technique involved a cone shape. Some students took on that one, but it required more drying time where you have to squeeze it together in place. We drew an "x" and "t" on the black background paper with a ruler then glued these inside of each other on the lines. 


Again, really simple, but it kept them focused on making their squares uniform, keeping the pattern in tact. 


Everyone gawked at these in the hall, and the kids seemed really proud of their work. I'm brainstorming ways to make the project more complex, but these took them nearly three weeks as it was, and some were still not able to finish on time. There was an entire movement in art that was founded on "less is more," so why fix something that is already awesome? One thing we could try is making them into a value scale that began with the shades in the middle and "bursted" into tints as they radiated out. That is what I love about art projects- there will always be endless possibilities keeping things new and refreshed every year. 

Saturday, January 18, 2014

The Northern Lights

I have been seeing tons of cute winter-related projects, and ran across this one centered on The Northern Lights. Kids are fascinated by bright colors, and they seem to still have a love for science at this point. I tried to do my own research on the Lights, but it's a hard phenomenon to explain. Basically what I gathered was that the poles attract energy, causing these brilliant colors in places like Alaska and Russia. 

I found the title below, and it reminds me of mythology, painting these stories behind why the Lights are there. There are dancing natives, swans flapping their wings, warriors shooting arrows, etc. I asked the kids if they could explain this, and they all seemed to have a better grasp on it than I did!


We started by making 4 diagonal lines with black paint for the trees. I showed them how to brush down and away to form the actual tree with their paint. We let them dry for a few minutes before adding the chalk pastel lights in the sky. Blending the chalk into the construction paper was very helpful so that the loose dust didn't smear everywhere later. 


We drew a simple polar bear using mostly circles and half circles. They outlined him in black marker before smudging some grey chalk around his neck and eyes to show some value. They cut him and pasted him into the Alaskan environment. Simple as that!


Thursday, January 9, 2014

Christmas time

I decided to just make a compilation of all of the different Christmas projects that went on during the month of December across multiple grades. 

To start, Kindergarten made these lovely trees! I read them a Christmas book, then asked them to think of a shape that looks like it would fit inside a tree. They came up with a triangle, so they drew a triangle on their red paper. Then I laid out a bunch of skinny strips of paper (about 1/2 inch). I asked them to cut them so that they gradually get larger to fill their triangle. After they were done, they got some gray paper to make into presents under the tree. 


The next week, we read a book about Santa's elves, so they made elf feet. I showed them how to draw the skirt and booties, but I ended up drawing most of the booties for them... I think they will be getting a template next year... It was so cute to see them connect the booties to the skirts with the legs in stockings. They all looked like noodle legs. They seemed confused why we would only draw the elves' bottom halves. I told them it was an artistic approach. 


First grade watched a digital version of the Dr Seuss book "How the Grinch Stole Christmas." That took quite a while, so the next day, they watched the music video to "You're a Mean One, Mr. Grinch." They seemed to like that even better! I let them go to town making Whoville with topsy-turvy architectural features. Afterwards, I walked through drawing the Grinch on green construction paper. They turned out really well! I told them to not worry if their grinch wasn't very pretty, because he is just an ugly dude.


Another week with first grade, we read a book about the reindeer, so we drew this cute reindeer/moose with ornaments adorning his antlers. They used markers for the contour and filled him in with various shades of brown crayons. 


I found the cutest book online and ordered it from the public library. It was called "The Snow Globe Family," and it was about a family that lived inside a snow globe. Realistic? No. But what a fun idea! So the kids drew their own snow globes and cut out a tree and a gingerbread house to go inside. The second day, they drizzled some white paint and topped it with glitter. Kids love glitter! They left looking like little fairies. Some classes had the time to use hole punches to add lights to the gingerbread houses and other scrap paper to make snowmen and stars on their trees, etc. 


Unfortunately, third and fourth grade were busy with nesting dolls and weaving, so they didn't have a Christmas project. Fifth grade, however, had a little extra time to make these candy canes. They used Crayola color sticks. This was a very simple drawing, but what made them look so great is their use of highlights and shadows. I showed them how to blend white into the center to make that highlight that runs down the middle. They also did some highlights on the light bulbs. Some had the time to work in shadows, as well. 


Monday, December 30, 2013

Nesting Dolls

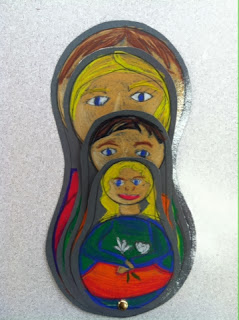
I ran across some cute pictures of nesting doll products on Pinterest, and thought it would be really cute to have the kids make some. I thought about busting out the model magic, but just couldn't find the time left before Christmas to accomplish it. So instead, I made it into a drawing project. Part of third grade curriculum is to make a family portrait of some sort, and I figured this would be a fun way to accomplish that. I found a great website that walked through the history of the nesting doll/objects, so we just scrolled through that for awhile and talked about it.
I wanted to make sure their dolls all had a good base shape to them, so I taught them how to use safety compasses first. I gave them almost 20 minutes with scrap paper to just practice making circles with the compass. You would have thought I gave them new iPads or something... It entertained them forever! 


Once they got the circles down, I gave them a large piece of gray construction paper. I showed them how to stack a smaller circle on top of a larger circle to get the basic shape of the nesting doll. These compasses had the rulers on them, so I was able to explain how to make sure the circles would be the right size they needed. Some kids had as many as seven family members, and others had three. The ones with more just did smaller dolls, but I told them they could choose how many.
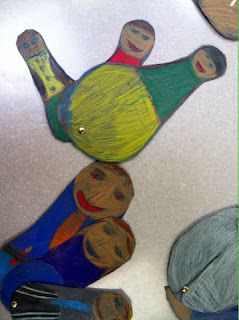
They understood how to make the faces and hair for the most part, but adding the clothes was definitely challenging. I told them to start with the neckline, shoulders, and waist.


I chose to have them use color sticks to fill the dolls in. These sticks are wonderful! They are sort of combination of a colored pencil and crayon. They are relatively expensive and shatter pretty easily, so I usually just trust the older kids with them. I love how well they blend together. The color choices are limited, but we were able to pretty much make any color we needed. The colors above are skin tones and hair colors I showed them how to make. 


I emphasized outlining with darker but similar colors a lot. For example, below I outlined the orange shirt with red so that the sleeves were differentiated from the shirt. 


While the kids were still drawing them, I had taken mine to an elementary art meeting in the district. God bless these sweet ladies, they are sooo incredibly helpful to me! One of them suggested fastening them together with a brad so the kids could actually "nest" them. 

And it worked wonderfully!!!!! 


As you can see, the kids all had their own "unique" shape going on with their dolls, but they all looked cute nonetheless! 


A few days too late, I ran across this book on the shelf in our library. It is a Russian folktale centered around Christmas. 


I flipped through the pages and ran across the Baboushka polishing these nesting dolls and thought this would be perfect to read to the kids! However, we just ran out of time... Next year! 

Stamp Designs

While rummaging through the drawers and cabinets of my new classroom back in August, I ran across several packages of these stamp-cut papers. I talked with the fifth grade teachers about something they were studying, so i could have their stamps relate. In science, they were studying animals- so it really doesn't get much easier than that! I had them all write down the animal of their choice, and my helpers and I went through all my how-to drawing books for each animal and made some photocopies for them to reference. 


I had them practice their animal several times in their artist's notebook so they could carefully plan out their design without wasting all the stamp paper. I encouraged them to add words with stencils and a cent value. They all wanted to color them, but I feared they would rush through it and take away from the fact that they produced some high-quality fifth grade drawings. 


We discussed value in a few previous projects, so I showed them how they could incorporate some value with ink. After pencil, they outlined everything in sharpies of various sizes. The shark below was a good example of value. I showed her how to gradually space out her pen strokes as she moved down the shark to transition from black to white. 


This turtle below, was my absolute favorite (if I'm allowed to have favorites). I wish he would have explored some texture or value more, but his contour drawing was so cute! Other turtles had generic grid-patterned shells, whereas he took the time give each piece of the shell attention. 


It's so hard not having the space or time to hang every single piece! They were all so cute, and they all worked so hard on them! It's amazing how much interest rises when they get to make a choice about what they draw. 

Saturday, December 21, 2013

Panda Bears


Animals are always a safe bet for kids. They seem to love all animals are fascinated by them. I figure this is an easy way to incorporate science and non-fiction books. After reading this book five times, I knew so much about pandas- you would think I had an obsession! The kids retain this stuff at crazy rates, as well. 


I started the first few days with a step-by-step panda I found online. The kids were struggling, but got it with a lot of guidance. It just felt like it was out of their "zone," though, so I found an easier one. You would be amazed at how well some books break down animals. The book I finally settled on made it very simple and doable for them. 

Once they got the panda drawn, which took about 15 minutes, they cut him out. They are still perfecting their cutting skills in first grade, Going in between toes and such is still pretty hard for them. They glued him to a piece of construction paper. I kept this one pretty small. The green paper is only 9x12. It's hard enough to get them to draw things big enough to fill that, let alone a full piece of construction paper. 

I they had time, they added the bamboo in the background. I showed them some pictures of bamboo and pointed out the lines in between each section of the stalks. So, they just glued rectangles on top of each other with a sliver of space in between. 

I really love doing how-to drawings with them, because it gives them so much confidence for drawing in the future. Obviously observation drawing is more "Accurate," but you have to start somewhere! And they wont know where to start if they can't located simple shapes inside a complex object/animal.